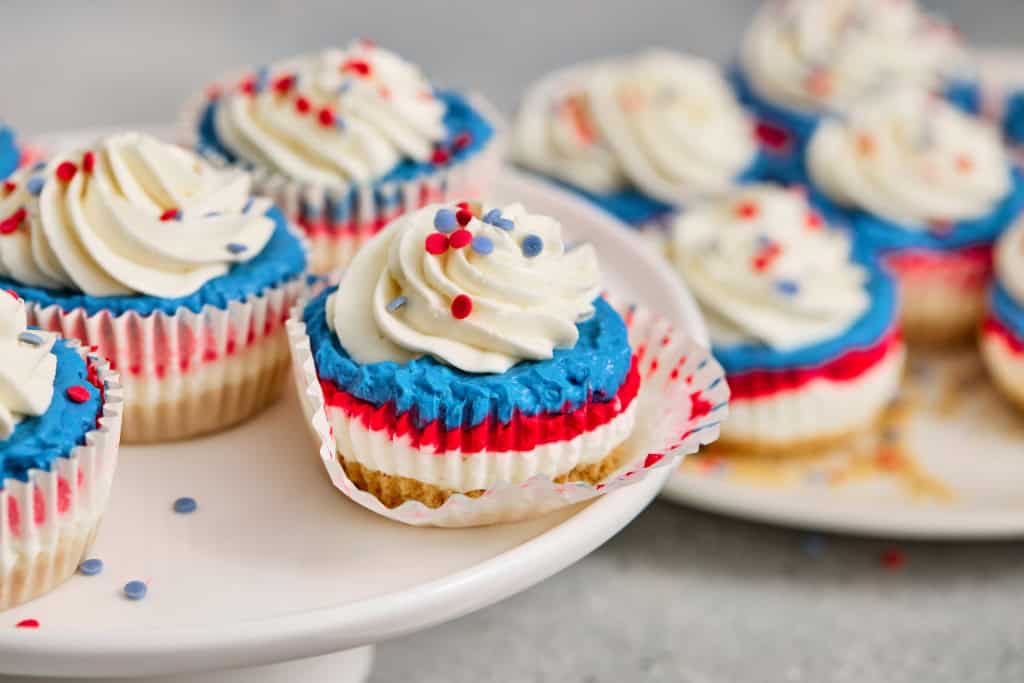
Patriotic No Bake Cheesecakes
These Patriotic No Bake Cheesecakes look impressive (hello, beautiful layers!), but they’re surprisingly simple. No complicated techniques. No water baths. No stress. Just creamy, colorful goodness.
Why You’ll Love These Mini Cheesecakes
If you’ve ever tried to slice a full cheesecake at a busy party while someone is asking for napkins and another kid needs help opening a juice box… you know why minis are the answer.
These are:
- Perfectly portioned
- Easy to grab and serve
- Kid-friendly
- Make-ahead approved
- Festive without being fussy
They’re ideal for Fourth of July celebrations, Memorial Day, summer birthdays, school events, or honestly any time you want something cheerful and fun.
And the best part? You can make them the day before and relax on party day. That alone is worth it.
Ingredients You’ll Need
For the Crust:
For the Cheesecake Filling:
For the Topping:
That’s it. No gelatin. No fancy stabilizers. Just classic cheesecake goodness.
Step 1: Prepare the Crust
Even though these are “no bake,” we’re giving the crust a quick bake to help it set beautifully. Don’t worry it’s only a few minutes.
- Preheat your oven to 350°F (180°C).
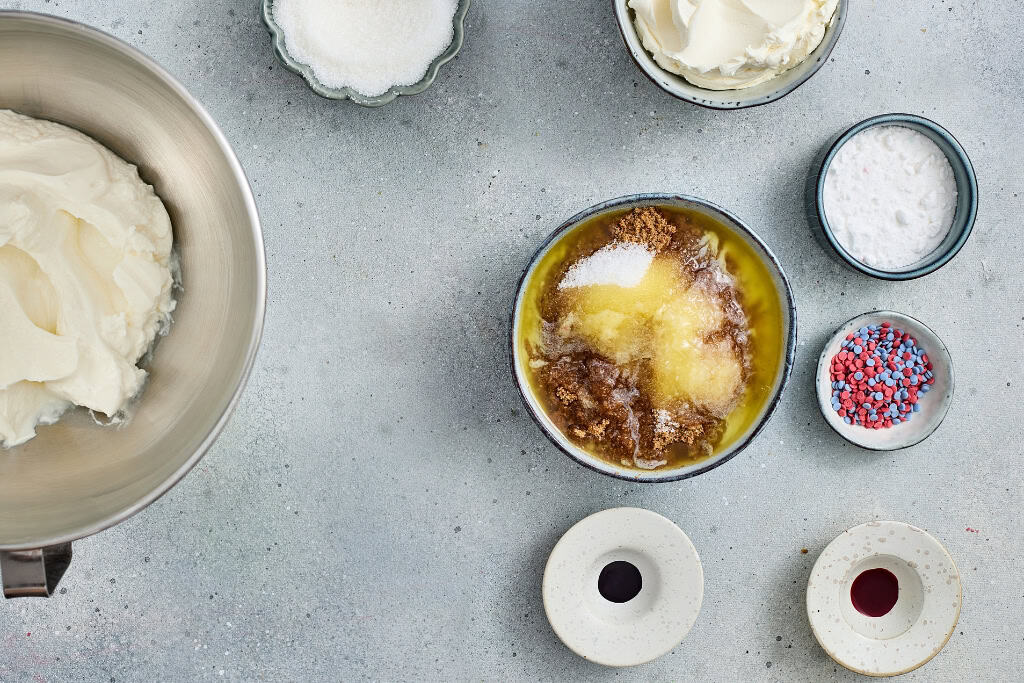
- In a medium bowl, combine:
- Crushed cookies or graham crumbs
- Sugar
- Melted butter
- Stir until the mixture looks like wet sand.
- Line a muffin tin with cupcake liners.
- Spoon a layer of the crumb mixture into each liner.
- Press down firmly with the back of a spoon (or the bottom of a small glass).
You want it packed in nicely this helps prevent crumbling later.
- Bake for 5–6 minutes, just until the crust sets.
- Let them cool completely before adding the filling.
Pro tip: If you’re short on time, pop the tray in the fridge to cool faster.
Step 2: Make the Cheesecake Filling
This part is where things get creamy and dreamy.
- In a large bowl, beat the softened cream cheese until smooth.
- Add the ½ cup granulated sugar.
- Beat until light and creamy with no lumps.
Take your time here. Scrape down the sides of the bowl as needed. Smooth filling equals pretty layers.
If your cream cheese is truly softened, this step will be effortless. Cold cream cheese is the number one reason for lumpy cheesecake ask me how I know!
Step 3: Color the Filling
Now comes the fun part.
- Divide the cheesecake mixture evenly into three bowls.
- Leave one bowl white.
- Add red gel food coloring to one bowl.
- Add blue gel food coloring to the other.
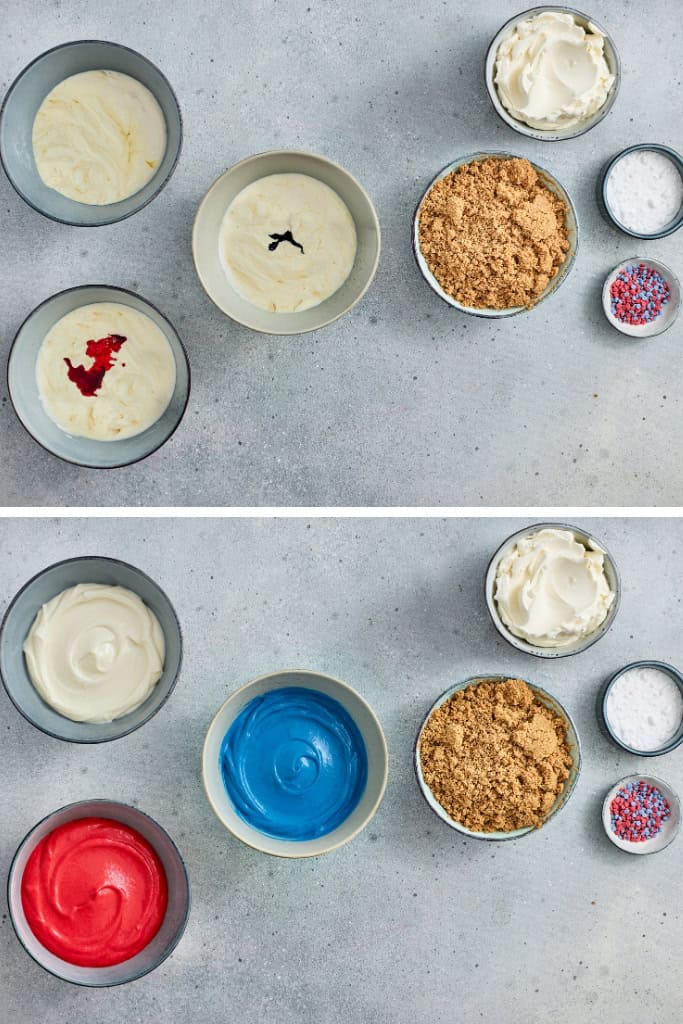
Mix each until evenly colored.
A little gel coloring goes a long way. Start small and build up. You want bold colors, but not neon overload.
Using gel instead of liquid food coloring keeps the texture thick and creamy.
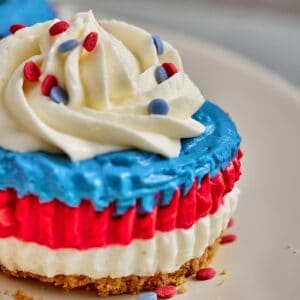
Step 4: Assemble the Cheesecakes
This is where the magic happens.
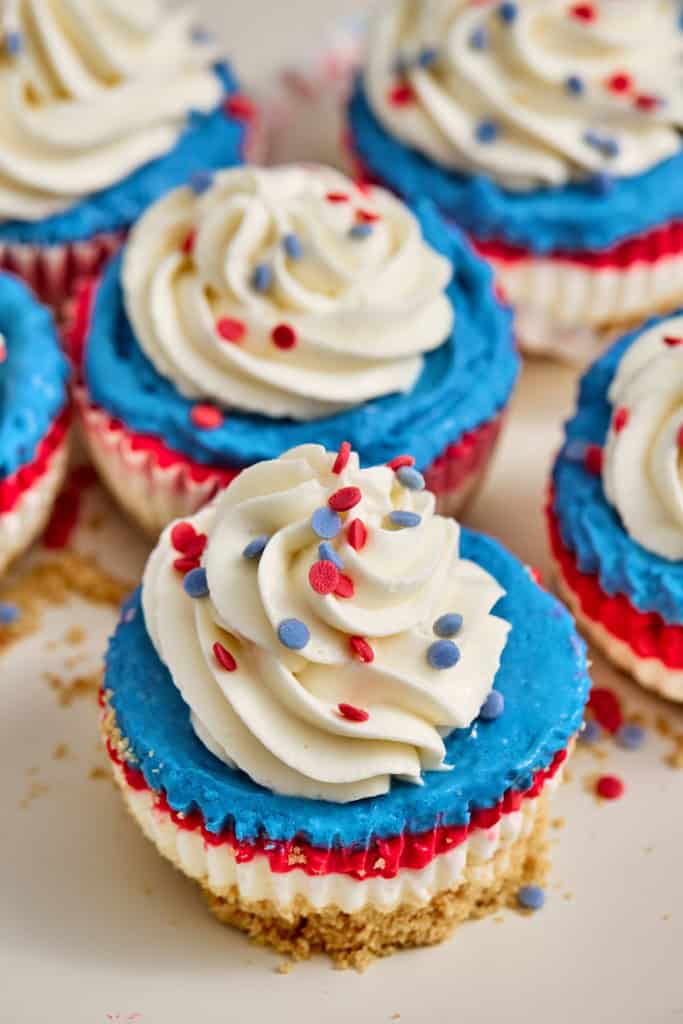
Layer the filling into each muffin liner in this order:
White → Red → Blue
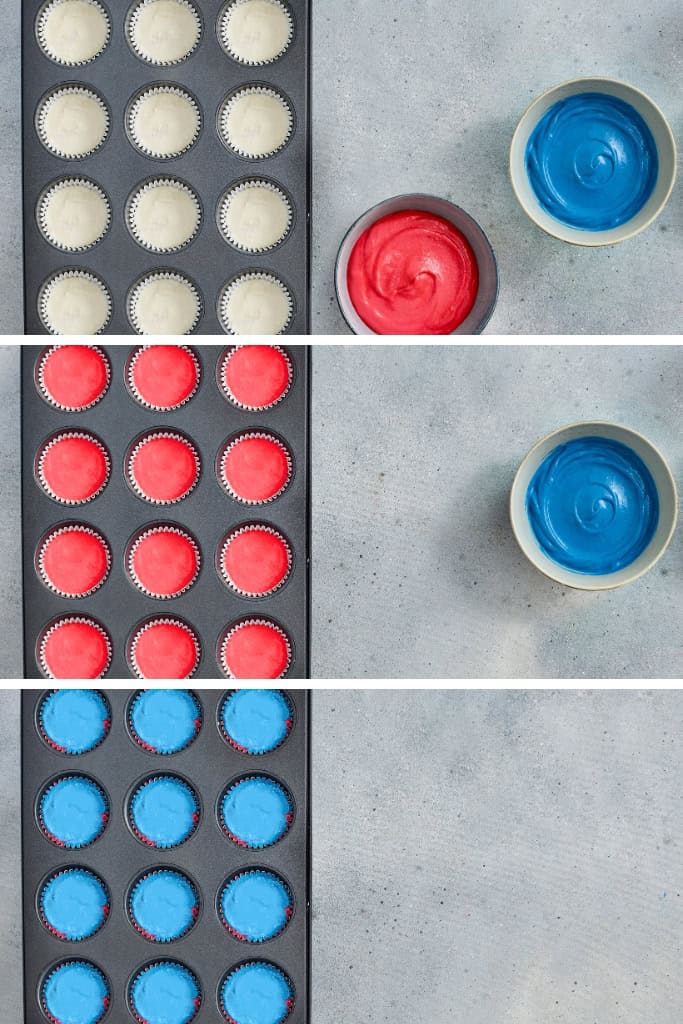
You can spoon it in gently or pipe it if you want cleaner layers.
After each layer, smooth it lightly before adding the next. It doesn’t have to be perfect once chilled and topped, they look gorgeous no matter what.
Once layered:
- Smooth the tops gently.
- Refrigerate for at least 4 hours, preferably overnight.
This chilling time is important. It allows the cheesecakes to firm up beautifully and makes them easy to decorate and serve.
I always make these the night before a party. Waking up knowing dessert is done? That’s a good feeling.
Step 5: Make the Cream Topping
Right before serving (or a few hours before), make the topping.
- Beat 1 cup cream cheese with 2–3 tbsp powdered sugar.
- Mix until smooth and fluffy.
- Transfer to a piping bag.
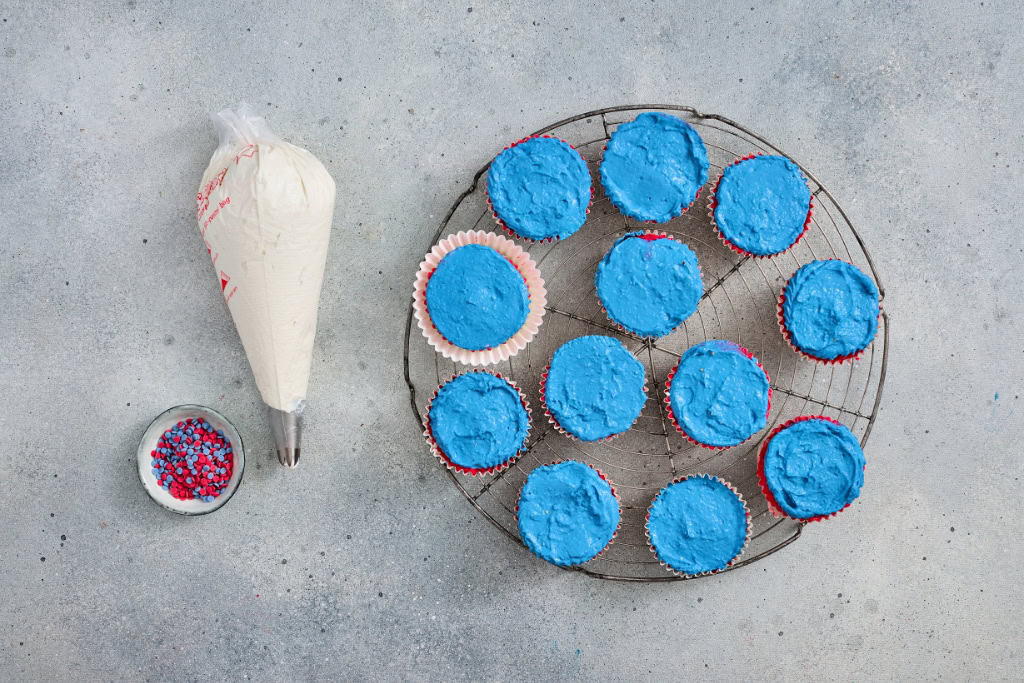
If you don’t have a piping bag, a zip-top bag with the corner snipped works perfectly.
Pipe a swirl on top of each chilled cheesecake.
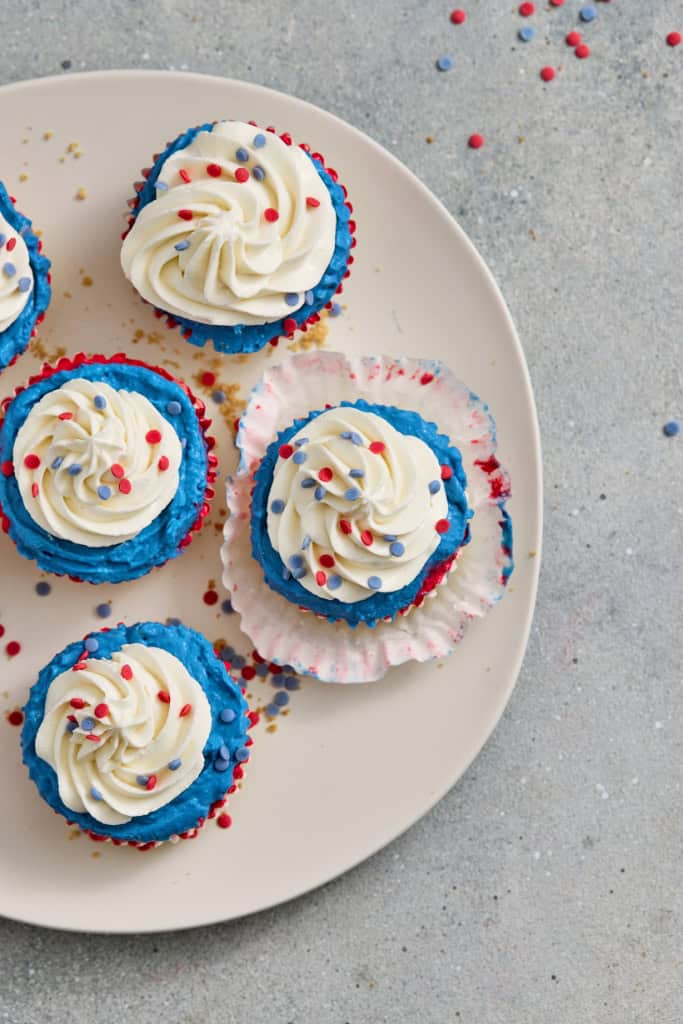
Step 6: Decorate & Serve
Now for the finishing touch.
Add red, white, and blue sprinkles on top.
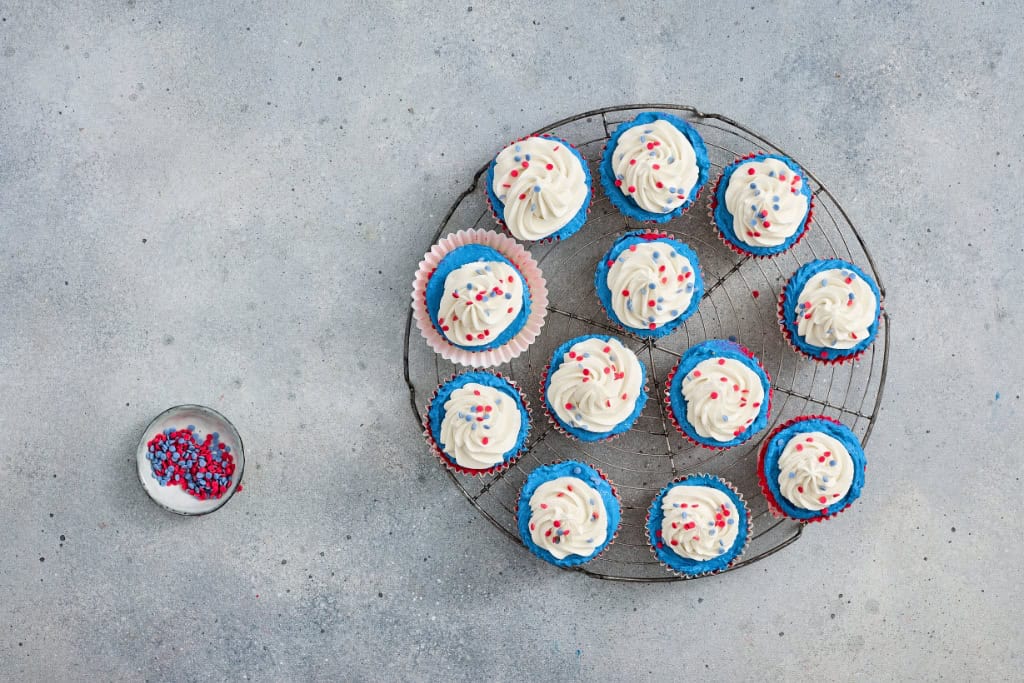
And just like that you have festive mini cheesecakes that look like they came straight from a bakery display case.
Keep them refrigerated until serving time.
Make-Ahead Tips
Let’s talk real life for a minute. Hosting can feel overwhelming. So here’s how to make this easy:
- Make the cheesecakes the day before.
- Store them covered in the fridge.
- Add the topping and sprinkles the day of serving.
That’s it. One less thing to worry about.
Helpful Tips From Experience
Use Full-Fat Cream Cheese
- It sets better and tastes richer.
Don’t Rush the Chill Time
- If they seem soft, they probably need more time in the fridge.
Press the Crust Firmly
- A loose crust equals crumbly bottoms.
Use Gel Coloring
- It keeps the texture thick and vibrant.
Keep Them Cold
- These hold their shape best when chilled until right before serving.
Fun Variations
Once you’ve made these once, you might start thinking of other color combos.
- Red and green for Christmas
- Pastels for Easter
- School colors for graduation
- Pink and purple for birthdays
The base recipe stays the same just switch the colors and sprinkles.
It’s one of those flexible desserts that works year-round.
Serving Ideas for Parties
These minis shine at:
- Backyard BBQs
- Family reunions
- Potlucks
- Pool parties
- Neighborhood block parties
- Church gatherings
Storage Instructions
- Store in an airtight container in the refrigerator.
- Best enjoyed within 3 days.
- Do not leave out at room temperature for long periods.
If transporting, keep them in a cooler with ice packs.
Frequently Asked Questions
Can I skip baking the crust?
You can, but the quick bake helps it hold together better. If skipping, chill the crusts for 30 minutes before filling.
Can I freeze them?
Yes! Freeze without topping. Thaw overnight in the fridge, then decorate.
Can I use whipped topping instead of cream cheese for the topping?
Absolutely. If you prefer something lighter, whipped topping works beautifully.
Can kids help make these?
Yes! Kids love helping with coloring and layering. It’s a great kitchen project.
These Patriotic No Bake Cheesecakes check every box. They’re creamy, colorful, and completely doable even on a busy week.
Make them once, and I promise they’ll become a regular in your celebration lineup.
Check Out More Patriotic Recipes
- Patriotic Cupcakes
- Patriotic Oreos
- Patriotic Chocolate Covered Twinkies
- Patriotic Pretzel Rods
- Patriotic Chocolate Bark
Patriotic No Bake Cheesecakes
Ingredients
For the Crust:
- 1 cup crushed cookies or graham crumbs 100 g
- 1 tbsp granulated sugar
- 3 tbsp melted butter
For the Cheesecake Filling:
- 500 g cream cheese, softened
- ½ cup 100 g granulated sugar
- Red and blue gel food coloring
For the Topping:
- 1 cup cream cheese
- 2-3 tbsp powdered sugar
- Red, white & blue sprinkles
Instructions
- Preheat your oven to 350°F (180°C).
- In a medium bowl, combine: crushed cookies or graham crumbs, sugar, melted butter. Stir until the mixture looks like wet sand.
- Line a muffin tin with cupcake liners.
- Spoon a layer of the crumb mixture into each liner. Press down firmly with the back of a spoon (or the bottom of a small glass). You want it packed in nicely this helps prevent crumbling later.
- Bake for 5–6 minutes, just until the crust sets. Let them cool completely before adding the filling.
- In a large bowl, beat the softened cream cheese until smooth.
- Add the ½ cup granulated sugar. Beat until light and creamy with no lumps. Take your time here. Scrape down the sides of the bowl as needed. Smooth filling equals pretty layers.If your cream cheese is truly softened, this step will be effortless. Cold cream cheese is the number one reason for lumpy cheesecake ask me how I know!
- Divide the cheesecake mixture evenly into three bowls. Leave one bowl white. Add red gel food coloring to one bowl. Add blue gel food coloring to the other.
- Mix each until evenly colored. A little gel coloring goes a long way. Start small and build up. You want bold colors, but not neon overload. Using gel instead of liquid food coloring keeps the texture thick and creamy.
- Layer the filling into each muffin liner in this order: White → Red → BlueYou can spoon it in gently or pipe it if you want cleaner layers.
- After each layer, smooth it lightly before adding the next. It doesn’t have to be perfect once chilled and topped, they look gorgeous no matter what.
- Once layered: Smooth the tops gently.
- Refrigerate for at least 4 hours, preferably overnight.This chilling time is important. It allows the cheesecakes to firm up beautifully and makes them easy to decorate and serve.
- Beat 1 cup cream cheese with 2–3 tbsp powdered sugar. Mix until smooth and fluffy.
- Transfer to a piping bag. If you don’t have a piping bag, a zip-top bag with the corner snipped works perfectly. Pipe a swirl on top of each chilled cheesecake.
- Add red, white, and blue sprinkles on top.


